如题,主要搭建 linux 内核的调试环境。
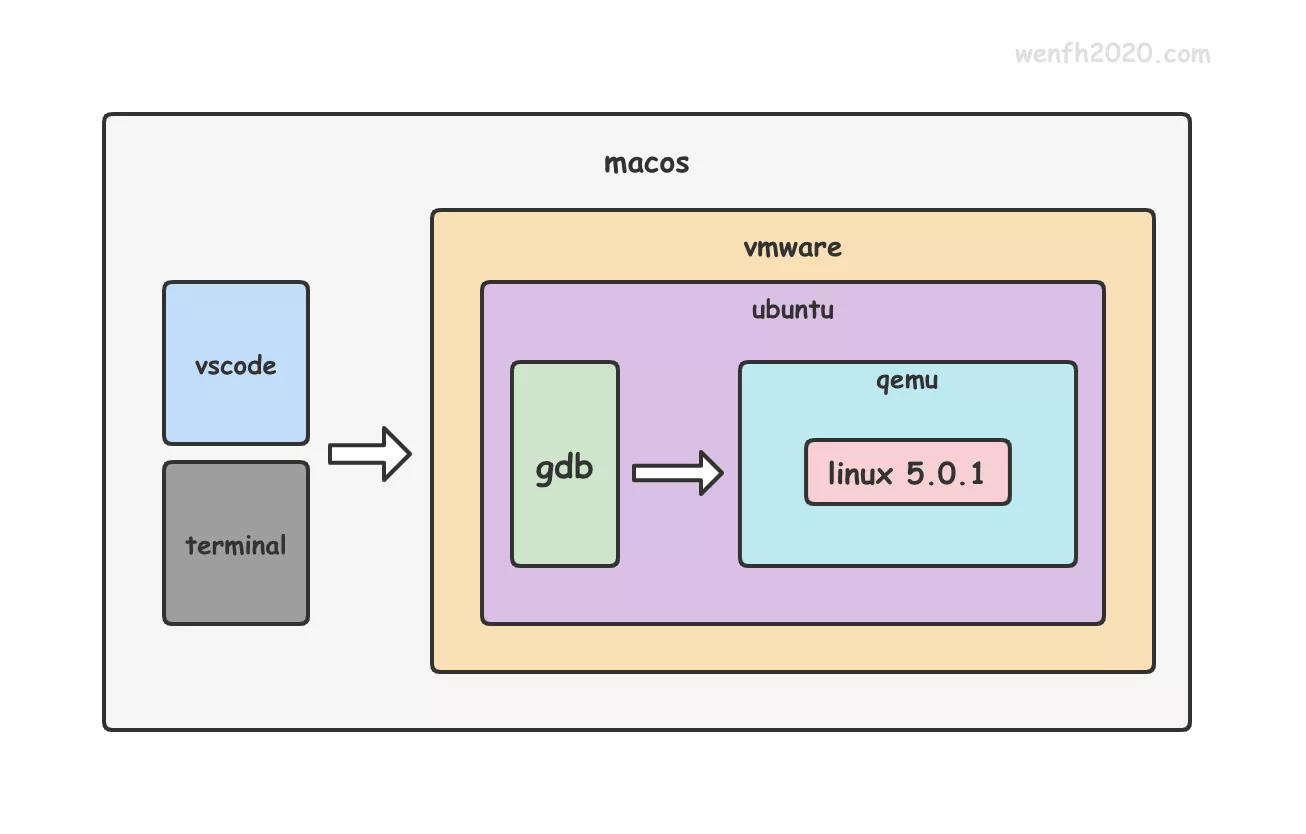
qemu 模拟器运行 linux,然后通过 gdb 调试 linux 内核源码。
前段时间曾出过两个视频,比较粗糙,最近重新整理了一下环境搭建流程,还加入了网桥搭建流程,可以调试 linux 内核虚拟网卡的驱动部分源码。
1. 环境
macos + vmware + ubuntu + gdb + qemu + linux kernel。
调试环境是跑在虚拟机里的,相信 windows 也能搭建起来,当然使用 docker 也是个非常不错的选择。

| 环境 | 版本 |
|---|---|
| macos | macOS Monterey - 12.0.1 |
| vmware | VMware Fusion - 专业版 12.0.0 (16880131) |
| ubuntu | 14.04.6 |
| gdb | GNU gdb (GDB) 8.3 |
| qemu | QEMU emulator version 2.0.0 (Debian 2.0.0+dfsg-2ubuntu1.46) |
| linux kernel | linux-5.0.1 |
2. 视频
3. 流程
3.1. 下载 ubuntu
1
2
# 镜像下载链接。
http://mirrors.aliyun.com/ubuntu-releases/14.04/ubuntu-14.04.6-desktop-amd64.iso
3.2. vmware 安装 ubuntu
- 虚拟系统磁盘空间,尽量给大一些,例如 100 G。
- 通过 root 权限安装 linux 内核。
- 安装常用工具。
1
2
3
4
5
6
7
8
9
10
11
12
13
14
15
16
17
18
19
20
21
# 设置 root 密码。
sudo passwd
# 切换 root 用户。
su root

# 安装部分工具。
apt-get install vim git tmux openssh-server -y

vi /etc/ssh/sshd_config
# 注释掉禁止 root 远程登录项。
#PermitRootLogin without-password

# 启动 ssh. 方便远程操作,避免后面 qemu 调试导致界面卡死,可以远程关闭进程。
ps -e | grep ssh
sudo /etc/init.d/ssh start

# 添加快捷命令方便操作终端。
vim ~/.bashrc
# 添加 alias c='clear'
# 添加 alias linux='cd /root/linux-5.0.1'
source ~/.bashrc
3.3. 下载编译 linux 内核
1
2
3
4
5
6
7
8
9
10
11
12
13
14
15
16
17
18
19
20
21
22
23
24
25
26
27
28
29
30
31
32
33
34
35
36
37
38
39
40
41
42
43
# 下载内核源码。
cd /root
wget https://cdn.kernel.org/pub/linux/kernel/v5.x/linux-5.0.1.tar.gz
tar zxf linux-5.0.1.tar.gz
cd linux-5.0.1

# 安装编译依赖组件。
apt install build-essential flex bison libssl-dev libelf-dev libncurses-dev -y

# 设置调试的编译菜单。
export ARCH=x86_64
make x86_64_defconfig
make menuconfig

# 下面选项如果没有选上的,选上(点击空格键),然后 save 保存设置,退出 exit。
##################################################################
General setup  --->
    [*] Initial RAM filesystem and RAM disk (initramfs/initrd) support

Device Drivers  --->
    [*] Block devices  --->
        <*> RAM block device support
            (65536) Default RAM disk size (kbytes)

Processor type and features  --->
    [*] Randomize the address of the kernel image (KASLR)

Kernel hacking  --->
    Compile-time checks and compiler options  --->
        [*] Compile the kernel with debug info
            [*] Provide GDB scripts for kernel debugging

Device Drivers -->
    Network device support -->
        <*> Universal TUN/TAP device driver support

[*] Networking support -->
        Networking options -->
            <*> 802.1d Ethernet Bridging
##################################################################

# 编译内核。
make -j4
3.4. 源码安装 gdb
源码安装高版本的 gdb 8.3。
1
2
3
4
5
6
7
8
9
10
11
12
13
14
15
16
17
18
19
20
21
22
23
24
25
# 删除 gdb
gdb -v | grep gdb
apt remove gdb -y

# 安装其它组件。
sudo add-apt-repository ppa:ubuntu-toolchain-r/test
sudo apt install software-properties-common
sudo apt-get update

# 安装高版本 gcc。
gcc --version
sudo apt-get install gcc-snapshot -y
sudo apt install gcc-9 g++-9 -y
sudo update-alternatives --install /usr/bin/gcc gcc /usr/bin/gcc-9 90 --slave /usr/bin/g++ g++ /usr/bin/g++-9
gcc --version

# 下载解压 gdb
cd /root
#wget https://mirror.bjtu.edu.cn/gnu/gdb/gdb-8.3.tar.xz
wget http://ftp.gnu.org/gnu/gdb/gdb-8.3.tar.gz
tar zxf gdb-8.3.tar.gz

# 修改 gdb/remote.c 代码。
cd gdb-8.3
vim gdb/remote.c
1
2
3
4
5
6
7
8
9
10
11
12
13
14
15
16
17
18
/* Further sanity checks, with knowledge of the architecture.  */
// if (buf_len > 2 * rsa->sizeof_g_packet)
//   error (_("Remote 'g' packet reply is too long (expected %ld bytes, got %d "
//      "bytes): %s"),
//    rsa->sizeof_g_packet, buf_len / 2,
//    rs->buf.data ());

if (buf_len > 2 * rsa->sizeof_g_packet) {
    rsa->sizeof_g_packet = buf_len;
    for (i = 0; i < gdbarch_num_regs(gdbarch); i++) {
        if (rsa->regs[i].pnum == -1)
            continue;
        if (rsa->regs[i].offset >= rsa->sizeof_g_packet)
            rsa->regs[i].in_g_packet = 0;
        else
            rsa->regs[i].in_g_packet = 1;
    }
}
1
2
3
4
5
6
./configure
make -j4
cp gdb/gdb /usr/bin/

# 恢复低版本 gcc。
sudo update-alternatives --install /usr/bin/gcc gcc /usr/bin/gcc-4.8 100
3.5. gdb 调试内核
通过 gdb 远程调试内核。
1
2
3
4
5
6
7
8
9
10
11
12
13
14
15
16
17
18
19
20
21
22
23
24
25
26
27
28
29
30
31
32
33
34
35
36
37
38
# 安装 qemu 模拟器,以及相关组件。
apt install qemu libc6-dev-i386 -y

# 虚拟机进入 linux 内核源码目录。
cd /root/linux-5.0.1

# 从 github 下载内核测试源码。
git clone https://github.com/wenfh2020/kernel_test.git
# wget https://codeload.github.com/wenfh2020/kernel_test/zip/refs/heads/main
# unzip main
# mv kernel_test-main kernel_test

# 进入测试源码目录。
cd kernel_test/test_epoll_thundering_herd
# make 编译
make
# 通过 qemu 启动内核测试用例。
make rootfs
# 在 qemu 窗口输入小写字符 's', 启动测试用例服务程序。
s
# 在 qemu 窗口输入小写字符 'c', 启动测试用例客户端程序。
c

# 通过 qemu 命令启动内核测试用例进行调试。
qemu-system-x86_64 -kernel ../../arch/x86/boot/bzImage -initrd ../rootfs.img -append nokaslr -S -s
# 在 qemu 窗口输入小写字符 's', 启动测试用例服务程序。
s
# 在 qemu 窗口输入小写字符 'c', 启动测试用例客户端程序。
c

# gdb 调试命令。
gdb vmlinux
target remote : 1234
b start_kernel
b tcp_v4_connect
c
focus
bt
3.6. vscode 配置
- vscode 版本,使用 2024 版本
- remote-ssh 插件使用 1.4.0 版本。
3.6.1. vscode 插件
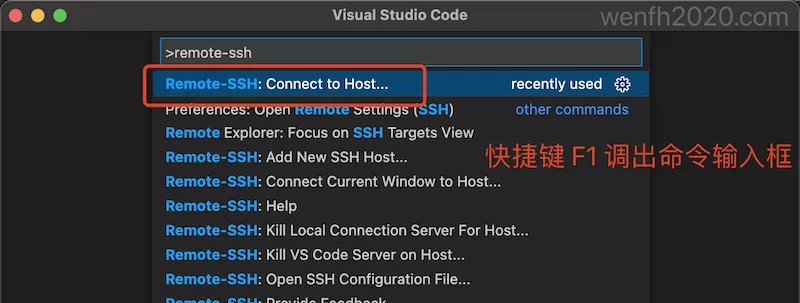
- remote-ssh
避免 remote-ssh 工作过程中频繁要求输入登录密码,最好设置一下 ssh 免密码登录(参考:[shell] ssh 快捷登录)。


- ms-vscode.cpptools (建议安装 1.4.0 版本)

3.6.2. 项目调试配置

1
2
3
4
5
6
7
8
9
10
11
12
13
14
15
16
17
18
19
20
21
{
    "version": "0.2.0",
    "configurations": [
        {
            "name": "kernel-debug",
            "type": "cppdbg",
            "request": "launch",
            "miDebuggerServerAddress": "127.0.0.1:1234",
            "program": "${workspaceFolder}/vmlinux",
            "args": [],
            "stopAtEntry": false,
            "cwd": "${workspaceFolder}",
            "environment": [],
            "externalConsole": false,
            "logging": {
                "engineLogging": false
            },
            "MIMode": "gdb",
        }
    ]
}
3.7. 搭建网桥
- 安装相关更新组件。
1
2
3
4
5
6
7
apt-get update

# 虚拟网桥工具
apt-get install bridge-utils

# UML(User-mode linux)工具
apt-get install uml-utilities
- 修改配置文件。
1
2
3
4
5
6
7
8
9
10
11
12
13
14
15
16
17
18
# vim /etc/network/interfaces
auto lo
iface lo inet loopback

auto br0
iface br0 inet dhcp

bridge_ports eth0
bridge_fd 9
bridge_hello 2
bridge_maxage 12
bridge_stp off

auto tap0
iface tap0 inet manual
pre-up tunctl -t tap0 -u root
pre-up ifconfig tap0 0.0.0.0 promisc up
post-up brctl addif br0 tap0
-
刷新网络(重启虚拟机)。
-
修改测试源码 ip。
1
2
3
4
5
6
7
cd /root/linux-5.0.1/kernel_test/test_epoll_thundering_herd
vim main.c

# 修改 SERVER_IP 宏对应的局域网 IP
#define SERVER_IP "192.168.10.221" /* server's ip. */

make rootfs
- 网络参数。
1
2
3
4
5
6
7
8
# qemu 网络参数配置。
-net nic -net tap,ifname=tap0,script=no,downscript=no

# 运行命令。
qemu-system-x86_64 -kernel ../../arch/x86/boot/bzImage -initrd ../rootfs.img -append nokaslr -net nic -net tap,ifname=tap0,script=no

# 调试命令。
qemu-system-x86_64 -kernel ../../arch/x86/boot/bzImage -initrd ../rootfs.img -append nokaslr -S -s -net nic -net tap,ifname=tap0,script=no
- telnet 测试网络设置情况。
1
telnet 192.168.10.221 5001
4. 更好方案
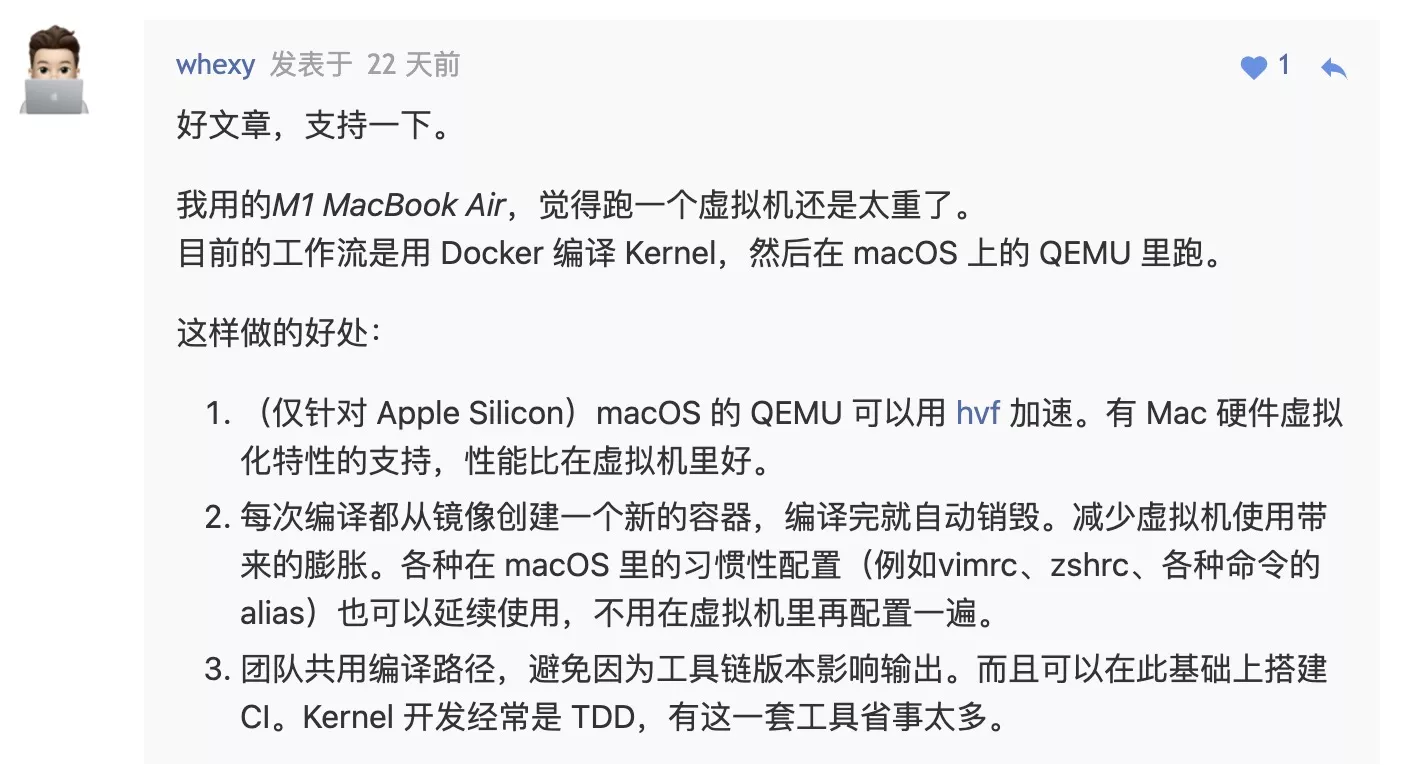
有热心的大佬给出了更好的解决方案:使用 docker 搭建调试环境,有兴趣的朋友不妨折腾一下。

5. 注意
- 搭建过程比较复杂,跑通了流程的朋友,记得保存镜像,避免以后修改了配置跑不起来。
- vscode 的 cpptools 有时候比较耗资源,使用 vscode 工具的朋友要有心理准备。

- 跑虚拟机比较耗资源,可以将调试环境搭建在 docker 容器里,这是个非常不错的选择,而搭建流程也是大同小异。

- 有些朋友反馈,gdb 调试过程中,变量显示 <optimized out>,而且有时候单步调试会乱跳,这是因为 linux 内核编译优化级别是 -O2,不是 -O0,遇到这种情况,多调试几步有些变量会正常显示,而且主体的调试流程一般不会乱跳。(改到 -O0 级别,内核源码编译不通过^_^!)


