
为了使用 linux 高版本内核功能,使用了 ubuntu 20.4,记录一下使用新系统时的相关软件安装配置。
1. 远程控制配置
本地机器远程控制阿里云实例。
- 本地为阿里云远程实例 ip 设置别名昵称。
1
2
3
4
sudo vim /etc/hosts

# 往文件 /etc/hosts 填充内容。
120.77.36.xxx   ali-u-20.4
- 远程连接。
1
ssh root@ali-u-20.4
- 本地机器免密码远程登录。
1
2
3
4
5
6
7
8
9
# 本地机器创建密匙
ssh-keygen -t rsa

# 本地机器将公钥拷贝到远程机器。
scp ~/.ssh/id_rsa.pub root@ali-u-20.4:~/.ssh/id_rsa.pub.mac

# 远程机器导入秘钥。
cd ~/.ssh
cat id_rsa.pub.mac >> authorized_keys
2. 查看系统相关信息
1
2
3
4
5
6
# 查看系统版本。
cat /proc/version
# 查看 cpu 核心。
cat /proc/cpuinfo | grep "processor" | wc -l
# 查看内存。
free
3. 安装
3.1. 安装基础插件
1
2
3
4
# 升级系统软件。
sudo apt-get update
# 安装基础插件。
sudo apt-get install git zip gdb htop -y
3.2. 安装 zsh
1
2
3
4
apt-get install zsh -y
wget https://github.com/robbyrussell/oh-my-zsh/raw/master/tools/install.sh
chmod +x install.sh
./install.sh
3.3. 安装 tmux
- 安装。
1
2
# 安装 tmux。
sudo apt-get install tmux -y
- 修改配置,将
ctrl + b组合键修改为ctrl + a。
1
2
3
4
5
6
7
8
9
10
11
12
13
14
15
16
17
18
# 打开 tmux 配置文件。
vim ~/.tmux.conf

# 往 .tmux.conf 文件填充下面配置内容
# +++++++++++++++++
set -g prefix C-a
unbind C-b
bind C-a send-prefix

# 设置在对应默认的 shell 下工作,笔者终端默认是 zsh。
set -g default-shell /bin/zsh
set -g default-command /bin/zsh
# +++++++++++++++++

# 启动 tmux,通过命令更新配置。
tmux
perfix + :
source ~/.tmux.conf
3.4. nginx 源码安装
- 安装。
1
2
3
4
5
6
7
8
9
10
11
12
13
14
15
16
wget https://nginx.org/download/nginx-1.20.1.tar.gz
tar zxf nginx-1.20.1.tar.gz
apt-get install libpcre3 libpcre3-dev -y
cd nginx-1.20.1
./configure --prefix=/usr/local/nginx
make && make install
# 创建软连接,方便操作。
ln -s /usr/local/nginx/sbin/nginx /usr/local/bin/nginx
# 查看 nginx 版本。
nginx -version
# 启动 nginx。
nginx
# 查看 nginx 进程。
ps -ef | grep nginx | grep -v grep
# 退出 nginx。
nginx -s stop
- 开启 debug 日志,需要重新配置编译,修改配置。
1
2
3
4
5
6
7
8
9
10
11
# 停止退出 nginx。
nginx -s stop
# 修改配置编译。
./configure --prefix=/usr/local/nginx --with-debug
make
# 修改配置文件。
vim /usr/local/nginx/conf/nginx.conf
# 将 error_log 等级改成 debug。
error_log  logs/error.log  debug;
# 重新启动。
nginx
3.5. 火焰图插件安装
- perf 安装。
1
2
apt-get install linux-tools-$(uname -r) linux-tools-generic -y
perf -v
- flamegraph 安装。
1
2
3
4
5
6
cd /usr/local/src
wget https://codeload.github.com/brendangregg/FlameGraph/zip/refs/heads/master
unzip master
cd FlameGraph-master
ln -s /usr/local/src/FlameGraph-master/flamegraph.pl /usr/local/bin/flamegraph.pl
ln -s /usr/local/src/FlameGraph-master/stackcollapse-perf.pl /usr/local/bin/stackcollapse-perf.pl
- 火焰图脚本(fg.sh)。
1
2
3
4
5
6
7
8
9
10
11
12
13
#!/bin/sh
work_path=$(dirname $0)
cd $work_path

if [ $# -lt 1 ]; then
    echo 'pls input pid!'
    exit 1
fi

[ -f perf_with_stack.data ] && rm -f perf_with_stack.data
# 这里睡眠 10 秒,可以根据需要修改睡眠时间。
perf record -g -o perf_with_stack.data -p $1 -- sleep 10
perf script -i perf_with_stack.data | stackcollapse-perf.pl | flamegraph.pl > perf.svg
- 脚本使用
fg.sh <pid>。通过脚本获取指定进程 id(pid)的火焰图,在脚本所在目录打开火焰图。
1
2
./fg.sh 999
xdg-open perf.svg

3.6. 安装 go
1
2
3
4
5
wget https://dl.google.com/go/go1.17.2.linux-amd64.tar.gz
rm -rf /usr/local/go && tar -C /usr/local -xzf go1.17.2.linux-amd64.tar.gz
export PATH=$PATH:/usr/local/go/bin
# 检查 go 是否安装成功。
go version
3.7. 安装 lantern
翻墙我常用的工具是 蓝灯 - lantern。在系统终端里下载外网的东西,也可以通过设置 lantern 的代理端口,参考下面步骤。
详细请参考:youtube 视频(需要翻墙观看)。
- 安装 lantern。
1
2
3
4
5
# 下载 deb 安装包。
wget https://s3.amazonaws.com/lantern/lantern-installer-64-bit.deb

# 安装
sudo dpkg -i lantern-installer-64-bit.deb
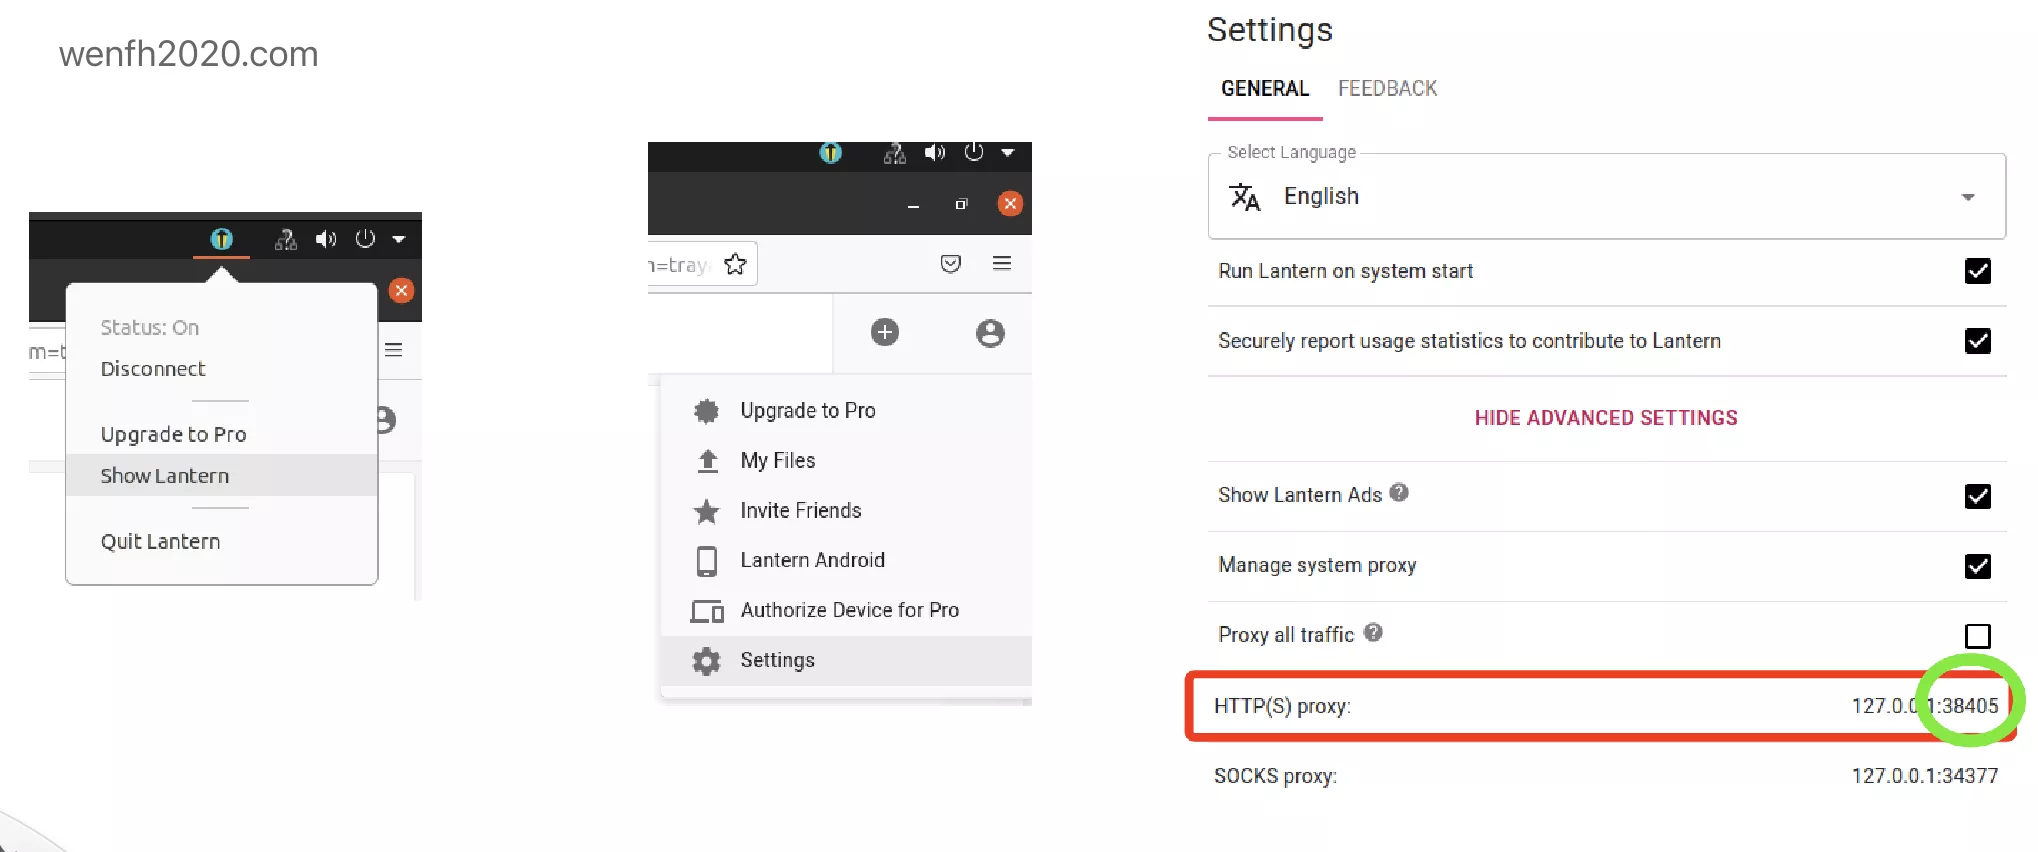
-
获取 lantern 的 http 代理端口号。
ShowLantern –> Settings –> ADVANCED SETTINGS –> HTTP(S)proxy
- 终端设置代理端口号。
1
2
3
4
# 根据上图的端口号,设置代理端口号。
export https_proxy=127.0.0.1:38405
# 下载翻墙的东西测试。
# wget https://github.com/robbyrussell/oh-my-zsh/raw/master/tools/install.sh