
Linux 操作系统,为了避免用户程序非法操作设备资源,需要限制进程的操作权限,这样内核为用户程序提供了一组交互的接口,用户程序通过这组接口进行 系统调用。
本文将会通过调试方式,从用户程序到内核,理解一下系统调用的工作流程。
文章 Linux 内核源码基于 Linux 5.0.1。
1. 概述
Linux 应用程序要与内核通信,需要通过 系统调用。系统调用,相当于用户空间和内核空间之间添加了一个中间层。
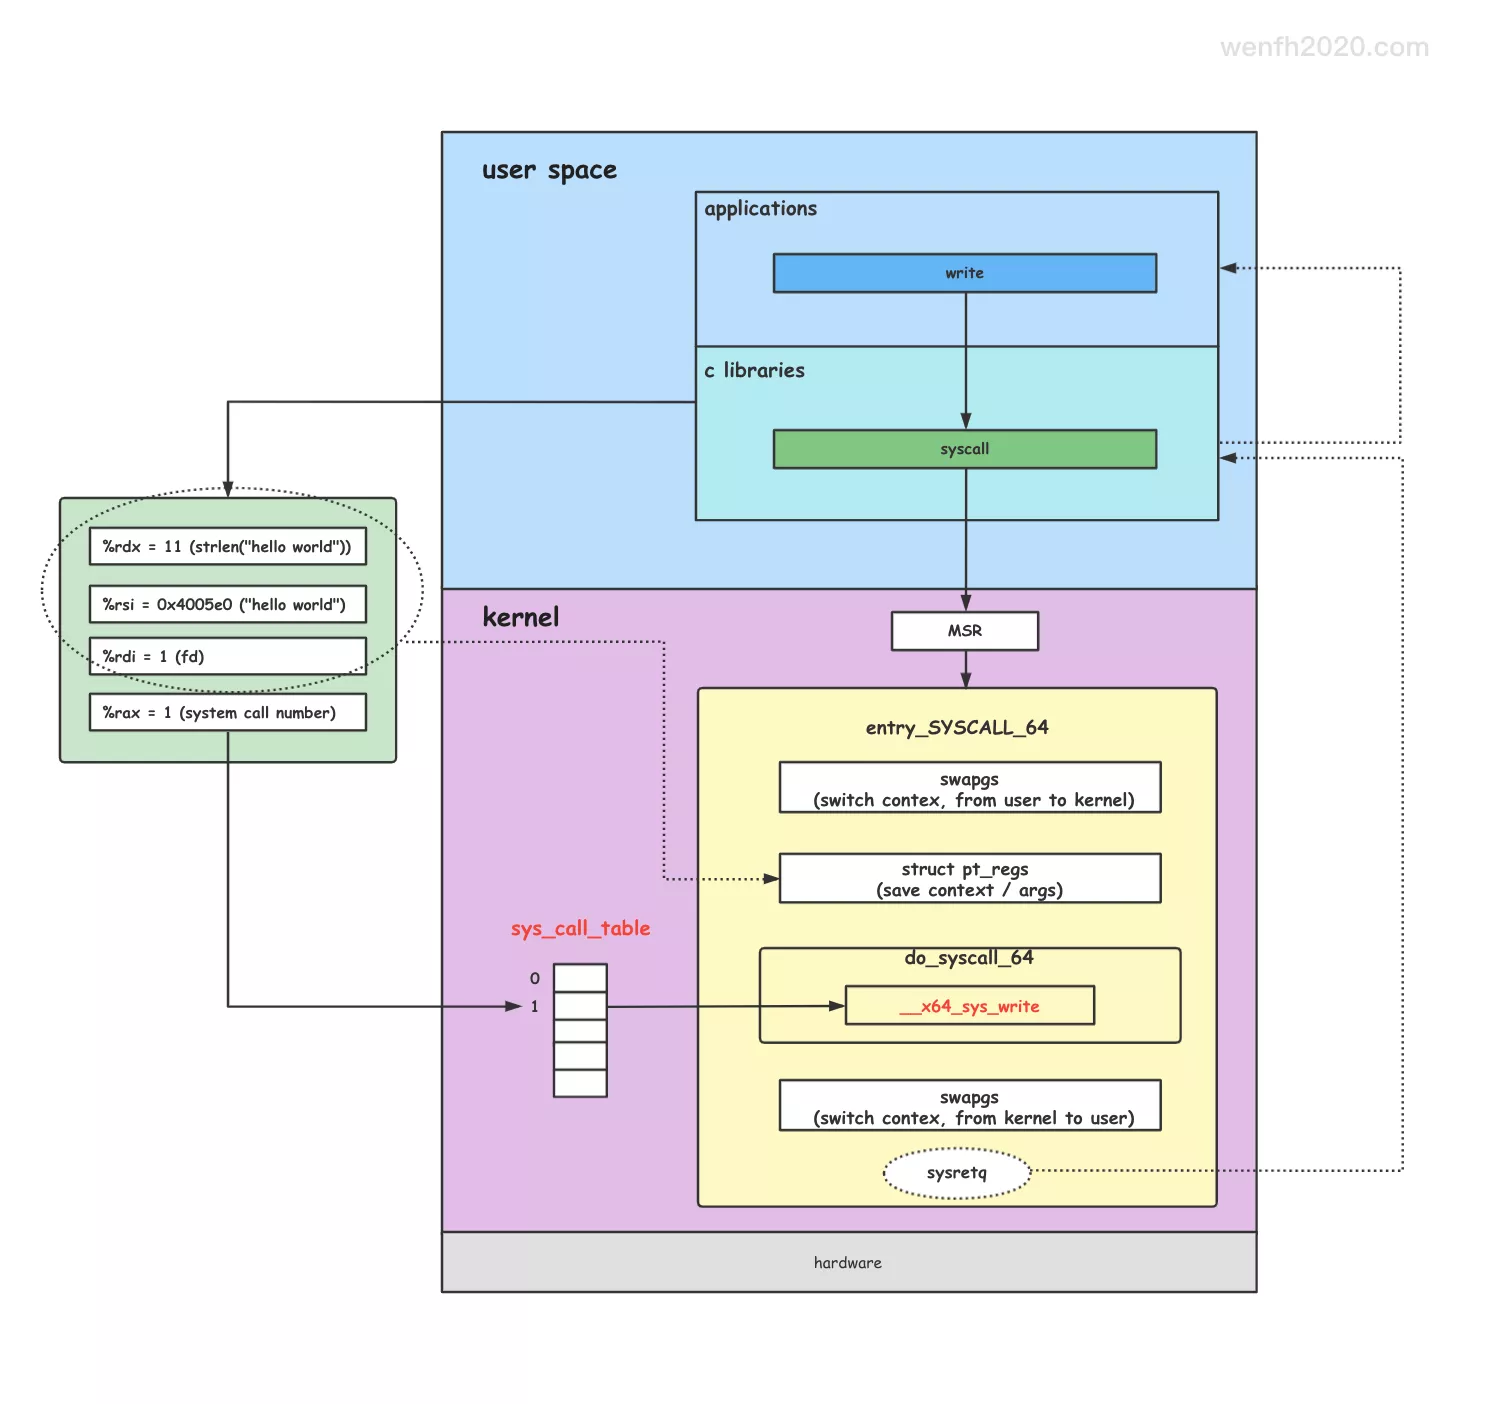
图片来源:Linux 系统调用
1.1. 系统调用作用
- 内核将复杂困难的逻辑封装起来,用户程序通过系统来操作硬件,极大简化了用户程序开发。
- 降低用户程序非法操作的风险,保证操作系统能安全,稳定地工作。
- 系统有效地分离了用户程序和内核开发。
- 通过接口访问黑盒操作,使得程序有更好的移植性。
详细信息请参考:wiki(链接需要翻墙)
2. 用户空间
2.1. 应用程序
c 语言程序(hello.c)。
1
2
3
4
5
6
7
8
9
10
/* hello.c
 * gcc main.c -g -O0 -o hello */
#include <stdio.h>
#include <string.h>
#include <unistd.h>

int main() {
    write(1, "hello world", strlen("hello world"));
    return 0;
}
系统为了运行 c 程序,每条 c 语句,被编译器翻译成低级语言指令,然后将这些指令按照一种可执行 目标程序 的格式打包,并以二进制磁盘文件的形式存放起来,目标程序也称为可执行目标程序。

图片来源:《深入理解计算机系统》- 第一章 计算机系统漫游 - 1.2 程序被其它程序翻译成不同的个数。
2.2. 动态库链接
程序通过 libc.so 动态库系统调用进入内核,具体源码实现还是比较复杂的,可以通过反汇编方式观察程序的工作流程,这样思路就清晰多了。
涉及到动态库链接原理,可以参考《深入理解计算机系统》- 第七章 链接 - 7.12 位置无关)。
1
2
3
4
5
6
7
8
9
10
11
12
13
14
15
16
17
18
19
20
21
22
23
24
25
26
27
28
29
30
31
32
33
34
35
36
37
38
39
40
41
42
43
44
# 用 gcc 编译 hello.c 源码。
➜ gcc main.c -g -O0 -o hello

# 查看 hello 程序调用的动态库,可见 hello 连接的是 libc.so 动态库。
➜ ldd hello
    linux-vdso.so.1 =>  (0x00007ffc424fc000)
    libc.so.6 => /lib64/libc.so.6 (0x00007f03462a4000)
    /lib64/ld-linux-x86-64.so.2 (0x00007f0346672000)

# 通过 objdump 查看程序的汇编代码。
➜ objdump -dS hello > asm.txt

#######################################################################
# 查看 asm.txt 文件保存的 hello 的汇编源码,hello 程序调用 libc.so 的接口。
#######################################################################

# 通过 (PLT) 调用全局偏移量表(GOT)对应的函数指针。
0000000000400400 <.plt>:
  400400:   ff 35 02 0c 20 00       pushq  0x200c02(%rip)        # 601008 <_GLOBAL_OFFSET_TABLE_+0x8>
  400406:   ff 25 04 0c 20 00       jmpq   *0x200c04(%rip)       # 601010 <_GLOBAL_OFFSET_TABLE_+0x10>
  40040c:   0f 1f 40 00             nopl   0x0(%rax)

# 跳转到过程链接表(PLT)。
0000000000400410 <write@plt>:

  400410:   ff 25 02 0c 20 00       jmpq   *0x200c02(%rip)       # 601018 <write@GLIBC_2.2.5>
  400416:   68 00 00 00 00          pushq  $0x0
  40041b:   e9 e0 ff ff ff          jmpq   400400 <.plt>

int main()
{
  # objdump -j .rodata -S hello | grep hello
  # 4005e0:       68 65 6c 6c 6f 20 77 6f 72 6c 64 00                 hello world
  ...
  # 将 write 的3个参数写入寄存器。
    write(1, "hello world", strlen("hello world"));
  400531:   ba 0b 00 00 00          mov    $0xb,%edx
  400536:   be e0 05 40 00          mov    $0x4005e0,%esi
  40053b:   bf 01 00 00 00          mov    $0x1,%edi
  # 调用 write 接口。
  400540:   e8 cb fe ff ff          callq  400410 <write@plt>
    return 0;
  ...
}
2.3. syscall
用户程序通过 syscall 指令从用户空间进入内核空间,而指令执行传递的参数和系统调用号,通过寄存器传递,这样速度更快,因为 CPU 访问寄存器比访问内存速度快。
1
hello -> write -> libc.so -> (syscall number / args) -> syscall (系统调用进入内核) -> retq(返回)
1
2
3
4
5
6
7
8
9
10
11
12
13
14
15
16
17
18
19
20
21
22
23
24
25
26
27
28
29
30
31
32
33
34
35
36
37
38
39
40
41
42
43
44
45
46
47
48
49
50
51
52
53
54
# 将 write 函数的参数,写入寄存器进行传递。
B+>|0x400531 <main+4>               mov    $0xb,%edx                                                                |
   |0x400536 <main+9>               mov    $0x4005e0,%esi                                                           |
   |0x40053b <main+14>              mov    $0x1,%edi                                                                |
# 调用 write 函数,通过 PLT(过程链接表)去查找 libc.so 动态库的对应接口。
   |0x400540 <main+19>              callq  0x400410 <write@plt>                                                     |
   |0x400545 <main+24>              mov    $0x0,%eax                                                                |
   |0x40054a <main+29>              pop    %rbp                                                                     |
   |0x40054b <main+30>              retq

# 链接动态库对应的接口。
   |0x400416 <write@plt+6>          pushq  $0x0                                                                     |
  >|0x40041b <write@plt+11>         jmpq   0x400400

# 进入 libc 动态库源码。
# ../sysdeps/unix/syscall-template.S
B+>|81    T_PSEUDO (SYSCALL_SYMBOL, SYSCALL_NAME, SYSCALL_NARGS)                                                 |
   |82    ret                                                                                            |
   |83    T_PSEUDO_END (SYSCALL_SYMBOL)

#############################
# gdb 在 write 接口设置断点,断点落在 libc 库里。
#############################
(gdb) b write
Breakpoint 2 at 0x7ffff7afca80: file ../sysdeps/unix/syscall-template.S, line 81.
(gdb) c
Continuing.
#############################

B+ |0x7ffff7afca80 <write>                  cmpl   $0x0,0x2dd52d(%rip)        # 0x7ffff7dd9fb4 <__libc_multiple_thre
   00x7ffff7afca87 <write+7>                jne    0x7ffff7afca99 <write+25>                                       |
# 将 write 的系统调用号,填充到 %eax 寄存器(注意:64 位是 %rax 寄存器)。
  >|0x7ffff7afca89 <__write_nocancel>       mov    $0x1,%eax                                                       |
# 执行系统调用,进程工作空间从用户空间转换到内核空间。
   |0x7ffff7afca8e <__write_nocancel+5>     syscall
   |0x7ffff7afca90 <__write_nocancel+7>     cmp    $0xfffffffffffff001,%rax                                        |
   |0x7ffff7afca96 <__write_nocancel+13>    jae    0x7ffff7afcac9 <write+73>                                       |
   |0x7ffff7afca98 <__write_nocancel+15>    retq                                                                   |

#############################
# gdb 查看寄存器数据
#############################
(gdb) info registers
# 系统调用号 1。
rax    0x1              1
# "hello world" 字符串长度。
rdx    0xb              11
# 0x4005e0 是 "hello world" 字符串虚拟地址。
rsi    0x4005e0         4195808
# fd 数值是 1。
rdi    0x1              1
# rip 寄存器记录 syscall 系统调用后返回的地址。
rip    0x7ffff7afca8e   0x7ffff7afca8e <__write_nocancel+5>
#############################
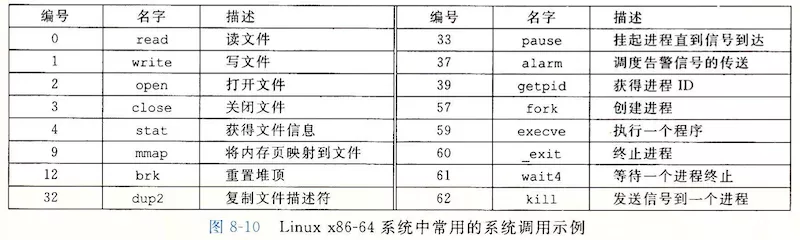
2.4. 系统调用号
1
用户程序  -> write -> 系统调用号(1)-> syscall -> 内核跳转表 -> 系统调用函数 (__x64_sys_write)
在 syscall 指令调用前,会先将 write 的系统调用号 1,填充到 %eax(64 位是 %rax)寄存器。
为什么要传递系统调用号到内核呢?因为每个系统调用在内核都有一个对应的处理函数,这个函数指针保存在 内核跳转表 中,这个表是一个数组,而系统调用号就是这个数组的下标,通过下标就能找到对应的系统调用函数。
而用户空间的函数参数也像系统调用号一样,通过写入寄存器传递到内核。
图片来源:《深入理解计算机系统》- 8.1 异常
3. 内核空间
用户空间通过 syscall 指令,从用户空间进入内核空间。
3.1. 内核调试
设置断点。在内核 write 函数名下断点,调试跟踪函数的调用堆栈。
1
2
3
4
/* fs/read_write.c : 610 */
SYSCALL_DEFINE3(write, unsigned int, fd, const char __user *, buf, size_t, count) {
    return ksys_write(fd, buf, count);
}
调试触发断点。查看函数调用堆栈,可以发现 syscall 指令触发 entry_SYSCALL_64 处理函数。
1
2
3
4
5
6
__do_sys_write() (/root/linux-5.0.1/fs/read_write.c:610)
__se_sys_write() (/root/linux-5.0.1/fs/read_write.c:607)
__x64_sys_write(const struct pt_regs * regs) (/root/linux-5.0.1/fs/read_write.c:607)
do_syscall_64(unsigned long nr, struct pt_regs * regs) (/root/linux-5.0.1/arch/x86/entry/common.c:290)
entry_SYSCALL_64() (/root/linux-5.0.1/arch/x86/entry/entry_64.S:175)
[Unknown/Just-In-Time compiled code] (Unknown Source:0)
3.2. 系统调用入口
entry_SYSCALL_64 是 64 位 syscall 指令 入口函数。
- 初始化系统调用。当 linux 内核启动时,
MSR特殊模块寄存器会存储 syscall 指令的入口函数地址;当 syscall 指令执行后,系统从特殊模块寄存器中取出入口函数地址进行调用。
早期的 x86 CPU 架构,系统调用依靠软中断实现,但是软中断要内存查表比较慢,后来为了执行
快速的系统调用,添加了一组 MSR 寄存器,分别存储了执行系统调用后,内核系统调用入口函数所需要的段寄存器、堆栈栈顶、函数地址。这样就不再需要内存查表了。(参考:《一口气看完45个寄存器,CPU核心技术大揭秘》)
1
2
3
4
start_kernel # init/main.c
|-- trap_init # arch/x86/kernel/traps.c
    |-- cpu_init # arch/x86/kernel/cpu/common.c
        |-- syscall_init # arch/x86/kernel/cpu/common.c
1
2
3
4
5
6
7
8
9
10
11
12
13
14
15
16
17
18
19
/* arch/x86/kernel/cpu/common.c */
void syscall_init(void) {
    wrmsr(MSR_STAR, 0, (__USER32_CS << 16) | __KERNEL_CS);
    /* 存储 syscall 指令入口函数。 */
    wrmsrl(MSR_LSTAR, (unsigned long)entry_SYSCALL_64);

#ifdef CONFIG_IA32_EMULATION
    wrmsrl(MSR_CSTAR, (unsigned long)entry_SYSCALL_compat);
    ...
    /* MSR 寄存器,分别内核系统调用入口函数后进入内核态所需要的段寄存器、堆栈栈顶、函数地址。 */
    wrmsrl_safe(MSR_IA32_SYSENTER_CS, (u64)__KERNEL_CS);
    wrmsrl_safe(MSR_IA32_SYSENTER_ESP,
            (unsigned long)(cpu_entry_stack(smp_processor_id()) + 1));
    wrmsrl_safe(MSR_IA32_SYSENTER_EIP, (u64)entry_SYSENTER_compat);
#else
    ...
#endif
    ...
}
- 入口函数工作流程:
- 程序从用户空间进入内核空间,保存用户态现场,载入内核态的信息,程序工作状态从用户态转变为内核态。
- 根据系统调用号,从系统跳转表中,调用对应的系统调用函数。
- 系统调用函数完成逻辑后,需要从内核空间回到用户空间,程序内核态转变为用户态,需要把之前保存的用户态现场进行恢复。
实现的详细流程,可以参考 entry_SYSCALL_64 的源码注释。
1
2
3
4
5
6
7
8
9
10
11
12
13
14
15
16
17
18
19
20
21
22
23
24
25
26
27
28
29
30
31
32
33
34
35
36
37
38
39
40
41
42
43
44
45
46
47
48
49
50
51
52
53
54
55
56
57
58
59
60
61
62
63
64
65
66
67
68
69
70
71
72
73
74
75
76
77
78
79
80
81
82
83
84
85
86
87
88
89
90
91
92
93
94
95
96
97
98
99
100
101
/* arch/x86/entry/entry_64.S
 *
 * 64-bit SYSCALL instruction entry. Up to 6 arguments in registers.
 *
 * This is the only entry point used for 64-bit system calls.  The
 * hardware interface is reasonably well designed and the register to
 * argument mapping Linux uses fits well with the registers that are
 * available when SYSCALL is used.
 *
 * SYSCALL instructions can be found inlined in libc implementations as
 * well as some other programs and libraries.  There are also a handful
 * of SYSCALL instructions in the vDSO used, for example, as a
 * clock_gettimeofday fallback.
 *
 * 64-bit SYSCALL saves rip to rcx, clears rflags.RF, then saves rflags to r11,
 * then loads new ss, cs, and rip from previously programmed MSRs.
 * rflags gets masked by a value from another MSR (so CLD and CLAC
 * are not needed). SYSCALL does not save anything on the stack
 * and does not change rsp.
 *
 * Registers on entry:
 * rax  system call number
 * rcx  return address
 * r11  saved rflags (note: r11 is callee-clobbered register in C ABI)
 * rdi  arg0
 * rsi  arg1
 * rdx  arg2
 * r10  arg3 (needs to be moved to rcx to conform to C ABI)
 * r8   arg4
 * r9   arg5
 * (note: r12-r15, rbp, rbx are callee-preserved in C ABI)
 *
 * Only called from user space.
 *
 * When user can change pt_regs->foo always force IRET. That is because
 * it deals with uncanonical addresses better. SYSRET has trouble
 * with them due to bugs in both AMD and Intel CPUs.
 */
ENTRY(entry_SYSCALL_64)
    UNWIND_HINT_EMPTY
    /*
     * Interrupts are off on entry.
     * We do not frame this tiny irq-off block with TRACE_IRQS_OFF/ON,
     * it is too small to ever cause noticeable irq latency.
     */

    /* 保存程序用户态现场,进入内核态。
     * https://www.felixcloutier.com/x86/swapgs
     * SWAPGS exchanges the current GS base register value
     * with the value contained in MSR address C0000102H (IA32_KERNEL_GS_BASE).
     * The SWAPGS instruction is a privileged instruction intended for use by system software.
     */
    swapgs
    /* tss.sp2 is scratch space. */
    /* 保存用户栈地址到寄存器。 */
    movq    %rsp, PER_CPU_VAR(cpu_tss_rw + TSS_sp2)
    /* 程序从用户栈跳转到内核栈工作,准备将寄存器数据存储到内核数据结构上 struct pt_regs。 */
    SWITCH_TO_KERNEL_CR3 scratch_reg=%rsp
    /* 获取内核栈顶地址,放入 %rsp 寄存器。 */
    movq    PER_CPU_VAR(cpu_current_top_of_stack), %rsp

    /* Construct struct pt_regs on stack
     * 保存寄存器数据到内核数据结构(struct pt_regs)。
     * arch/x86/include/uapi/asm/ptrace.h
     * struct pt_regs {
     *    ...
     *    unsigned long orig_rax;
     *    unsigned long rip;
     *    unsigned long cs;
     *    unsigned long eflags;
     *    unsigned long rsp;
     *    unsigned long ss;
     * };
     */
    /* 保存数据段起始地址。 */
    pushq    $__USER_DS                           /* pt_regs->ss */
    /* 保存函数栈栈顶地址。 */
    pushq    PER_CPU_VAR(cpu_tss_rw + TSS_sp2)    /* pt_regs->sp */
    /* 保存 CPU 标识。 */
    pushq    %r11                                 /* pt_regs->flags */
    /* 保存代码段起始地址。 */
    pushq    $__USER_CS                           /* pt_regs->cs */
    /* 保存 syscall 的下一条指令(指令寄存器)。 */
    pushq    %rcx                                 /* pt_regs->ip 保存着 syscall 的下一条指令。*/
GLOBAL(entry_SYSCALL_64_after_hwframe)
    /* 保存系统调用号。 */
    pushq    %rax                                 /* pt_regs->orig_ax */

    /* 将部分寄存器数据填充到 struct pt_regs 数据结构的其它成员。 */
    PUSH_AND_CLEAR_REGS rax=$-ENOSYS

    TRACE_IRQS_OFF

    movq    %rax, %rdi
    movq    %rsp, %rsi
    /* 调用 do_syscall_64 函数,执行系统调用逻辑。 */
    call    do_syscall_64
    ...
    /* 恢复现场,返回用户空间。 */
    USERGS_SYSRET64 /* swapgs; sysretq */
END(entry_SYSCALL_64)
- gdb 反汇编查看 entry_SYSCALL_64 函数功能。
1
2
3
4
5
6
7
8
9
10
11
12
13
14
15
16
17
18
19
20
21
22
23
24
25
26
27
28
29
30
31
32
33
34
35
36
37
38
39
40
41
42
43
44
45
46
47
48
49
50
51
52
53
54
55
56
57
58
59
60
61
62
63
64
65
66
67
68
69
70
71
72
73
74
75
76
77
78
79
80
81
82
83
84
85
86
87
88
89
90
91
92
93
94
95
96
97
98
99
100
101
102
103
104
105
106
107
108
109
110
111
112
113
114
115
   # layout split
   # 切换 CPU 工作模式,从用户模式切换到内核模式,保存用户态现场,载入内核态信息。
B+>|0xffffffff81a00010 <entry_SYSCALL_64>           swapgs                                           |
   # 保存用户态寄存器信息到内核数据结构 struct pt_regs。
   # 保存用户栈地址。
   |0xffffffff81a00013 <entry_SYSCALL_64+3>         mov    %rsp,%gs:0x5014                           |
   |0xffffffff81a0001c <entry_SYSCALL_64+12>        jmp    0xffffffff81a00030 <entry_SYSCALL_64+32   |
   ...
   # 将内核栈顶地址,填充 %rsp 寄存器。
  >|0xffffffff81a00030 <entry_SYSCALL_64+32>        mov    %gs:0x500c,%rsp
   # 保存用户态数据段起始地址。
   |0xffffffff81a00039 <entry_SYSCALL_64+41>        pushq  $0x2b                                     |
   # 保存用户态函数栈顶地址。
   |0xffffffff81a0003b <entry_SYSCALL_64+43>        pushq  %gs:0x5014                                |
   # saved rflags (note: r11 is callee-clobbered register in C ABI)
   |0xffffffff81a00043 <entry_SYSCALL_64+51>        push   %r11                                      |
   # 代码段起始地址。
   |0xffffffff81a00045 <entry_SYSCALL_64+53>        pushq  $0x33                                     |
   # return address
   |0xffffffff81a00047 <entry_SYSCALL_64+55>        push   %rcx                                      |
   # system call number
   |0xffffffff81a00048 <entry_SYSCALL_64+56>        push   %rax                                      |
   # arg0
   |0xffffffff81a00049 <entry_SYSCALL_64+57>        push   %rdi                                      |
   # arg1
   |0xffffffff81a0004a <entry_SYSCALL_64+58>        push   %rsi                                      |
   # arg2
   |0xffffffff81a0004b <entry_SYSCALL_64+59>        push   %rdx                                      |
  >|0xffffffff81a0004c <entry_SYSCALL_64+60>        xor    %edx,%edx                                 |
   |0xffffffff81a0004e <entry_SYSCALL_64+62>        push   %rcx                                      |
   |0xffffffff81a0004f <entry_SYSCALL_64+63>        xor    %ecx,%ecx                                 |
   |0xffffffff81a00051 <entry_SYSCALL_64+65>        pushq  $0xffffffffffffffda                       |
   # arg4
   |0xffffffff81a00053 <entry_SYSCALL_64+67>        push   %r8                                       |
   |0xffffffff81a00055 <entry_SYSCALL_64+69>        xor    %r8d,%r8d                                 |
   # arg5
   |0xffffffff81a00058 <entry_SYSCALL_64+72>        push   %r9                                       |
   |0xffffffff81a0005a <entry_SYSCALL_64+74>        xor    %r9d,%r9d                                 |
   # arg3 (needs to be moved to rcx to conform to C ABI)
   |0xffffffff81a0005d <entry_SYSCALL_64+77>        push   %r10                                      |
  >|0xffffffff81a0005f <entry_SYSCALL_64+79>        xor    %r10d,%r10d                               |
   |0xffffffff81a00062 <entry_SYSCALL_64+82>        push   %r11                                      |
   |0xffffffff81a00064 <entry_SYSCALL_64+84>        xor    %r11d,%r11d                               |
   |0xffffffff81a00067 <entry_SYSCALL_64+87>        push   %rbx                                      |
   |0xffffffff81a00068 <entry_SYSCALL_64+88>        xor    %ebx,%ebx                                 |
   |0xffffffff81a0006a <entry_SYSCALL_64+90>        push   %rbp                                      |
   |0xffffffff81a0006b <entry_SYSCALL_64+91>        xor    %ebp,%ebp                                 |
   |0xffffffff81a0006d <entry_SYSCALL_64+93>        push   %r12                                      |
   |0xffffffff81a0006f <entry_SYSCALL_64+95>        xor    %r12d,%r12d                               |
   |0xffffffff81a00072 <entry_SYSCALL_64+98>        push   %r13                                      |
   |0xffffffff81a00074 <entry_SYSCALL_64+100>       xor    %r13d,%r13d                               |
  >|0xffffffff81a00077 <entry_SYSCALL_64+103>       push   %r14                                      |
   |0xffffffff81a00079 <entry_SYSCALL_64+105>       xor    %r14d,%r14d                               |
   |0xffffffff81a0007c <entry_SYSCALL_64+108>       push   %r15                                      |
   |0xffffffff81a0007e <entry_SYSCALL_64+110>       xor    %r15d,%r15d                               |
   # 传递参数:系统调用号和 struct pt_regs 指针。
   |0xffffffff81a00081 <entry_SYSCALL_64+113>       mov    %rax,%rdi                                 |
   |0xffffffff81a00084 <entry_SYSCALL_64+116>       mov    %rsp,%rsi                                 |
   # 调用 do_syscall_64 函数,执行系统调用逻辑。
   |0xffffffff81a00087 <entry_SYSCALL_64+119>       callq  0xffffffff81003cf0 <do_syscall_64>        |
  >|0xffffffff81a0008c <entry_SYSCALL_64+124>       mov    0x58(%rsp),%rcx                           |
   |0xffffffff81a00091 <entry_SYSCALL_64+129>       mov    0x80(%rsp),%r11                           |
   |0xffffffff81a00099 <entry_SYSCALL_64+137>       cmp    %rcx,%r11                                 |
   |0xffffffff81a0009c <entry_SYSCALL_64+140>       jne    0xffffffff81a00974 <common_interrupt+52   |
   |0xffffffff81a000a2 <entry_SYSCALL_64+146>       shl    $0x10,%rcx                                |
   |0xffffffff81a000a6 <entry_SYSCALL_64+150>       sar    $0x10,%rcx                                |
   |0xffffffff81a000aa <entry_SYSCALL_64+154>       cmp    %rcx,%r11                                 |
   |0xffffffff81a000ad <entry_SYSCALL_64+157>       jne    0xffffffff81a00974 <common_interrupt+52   |
   |0xffffffff81a000b3 <entry_SYSCALL_64+163>       cmpq   $0x33,0x88(%rsp)                          |
   |0xffffffff81a000bc <entry_SYSCALL_64+172>       jne    0xffffffff81a00974 <common_interrupt+52   |
   |0xffffffff81a000c2 <entry_SYSCALL_64+178>       mov    0x30(%rsp),%r11                           |
  >|0xffffffff81a000c7 <entry_SYSCALL_64+183>       cmp    %r11,0x90(%rsp)                           |
   |0xffffffff81a000cf <entry_SYSCALL_64+191>       jne    0xffffffff81a00974 <common_interrupt+52>  |
   |0xffffffff81a000d5 <entry_SYSCALL_64+197>       test   $0x10100,%r11                             |
   |0xffffffff81a000dc <entry_SYSCALL_64+204>       jne    0xffffffff81a00974 <common_interrupt+52>  |
   |0xffffffff81a000e2 <entry_SYSCALL_64+210>       cmpq   $0x2b,0xa0(%rsp)                          |
   |0xffffffff81a000eb <entry_SYSCALL_64+219>       jne    0xffffffff81a00974 <common_interrupt+52>  |
   |0xffffffff81a000f1 <entry_SYSCALL_64+225>       pop    %r15                                      |
   |0xffffffff81a000f3 <entry_SYSCALL_64+227>       pop    %r14                                      |
   |0xffffffff81a000f5 <entry_SYSCALL_64+229>       pop    %r13                                      |
   |0xffffffff81a000f7 <entry_SYSCALL_64+231>       pop    %r12                                      |
   |0xffffffff81a000f9 <entry_SYSCALL_64+233>       pop    %rbp                                      |
   |0xffffffff81a000fa <entry_SYSCALL_64+234>       pop    %rbx                                      |
   |0xffffffff81a000fb <entry_SYSCALL_64+235>       pop    %rsi                                      |
  >|0xffffffff81a000fc <entry_SYSCALL_64+236>       pop    %r10                                      |
   |0xffffffff81a000fe <entry_SYSCALL_64+238>       pop    %r9                                       |
   |0xffffffff81a00100 <entry_SYSCALL_64+240>       pop    %r8                                       |
   |0xffffffff81a00102 <entry_SYSCALL_64+242>       pop    %rax                                      |
   |0xffffffff81a00103 <entry_SYSCALL_64+243>       pop    %rsi                                      |
   |0xffffffff81a00104 <entry_SYSCALL_64+244>       pop    %rdx                                      |
   |0xffffffff81a00105 <entry_SYSCALL_64+245>       pop    %rsi                                      |
   |0xffffffff81a00106 <entry_SYSCALL_64+246>       mov    %rsp,%rdi                                 |
   |0xffffffff81a00109 <entry_SYSCALL_64+249>       mov    %gs:0x5004,%rsp                           |
   |0xffffffff81a00112 <entry_SYSCALL_64+258>       pushq  0x28(%rdi)                                |
   |0xffffffff81a00115 <entry_SYSCALL_64+261>       pushq  (%rdi)                                    |
   |0xffffffff81a00117 <entry_SYSCALL_64+263>       push   %rax                                      |
   |0xffffffff81a00118 <entry_SYSCALL_64+264>       jmp    0xffffffff81a0015d <entry_SYSCALL_64+333> |
   ...
  >|0xffffffff81a0015d <entry_SYSCALL_64+333>       pop    %rax                                      |
   |0xffffffff81a0015e <entry_SYSCALL_64+334>       pop    %rdi                                      |
   |0xffffffff81a0015f <entry_SYSCALL_64+335>       pop    %rsp                                      |
   # 切换模式,从内核模式切换到用户模式。
   |0xffffffff81a00160 <entry_SYSCALL_64+336>       swapgs                                           |
   # 返回用户空间。
   |0xffffffff81a00163 <entry_SYSCALL_64+339>       sysretq                                          |
   |0x4010a0        cmp    $0xfffffffffffff001,%rax                                                  |
   |0x4010a6        jae    0x406060                                                                  |
  >|0x4010ac        retq                                                                             |
struct pt_regs。程序在系统调用后,从用户空间进入内核空间,保存用户态现场,保存用户态传入参数。
1
2
3
4
5
6
7
8
9
10
11
12
13
14
15
16
17
18
19
20
21
22
23
24
25
26
27
28
29
30
31
32
33
34
35
36
/* arch/x86/include/asm/ptrace.h */
struct pt_regs {
/*
 * C ABI says these regs are callee-preserved. They aren't saved on kernel entry
 * unless syscall needs a complete, fully filled "struct pt_regs".
 */
    unsigned long r15;
    unsigned long r14;
    unsigned long r13;
    unsigned long r12;
    unsigned long rbp;
    unsigned long rbx;
/* These regs are callee-clobbered. Always saved on kernel entry. */
    unsigned long r11;
    unsigned long r10;  /* 程序传递到内核的第 4 个参数。 */
    unsigned long r9;   /* 程序传递到内核的第 6 个参数。 */
    unsigned long r8;   /* 程序传递到内核的第 5 个参数。 */
    unsigned long ax;   /* 程序传递到内核的系统调用号。 */
    unsigned long cx;   /* 程序传递到内核的 syscall 的下一条指令地址。 */
    unsigned long dx;   /* 程序传递到内核的第 3 个参数。 */
    unsigned long si;   /* 程序传递到内核的第 2 个参数。 */
    unsigned long di;   /* 程序传递到内核的第 1 个参数。 */
/*
 * On syscall entry, this is syscall#. On CPU exception, this is error code.
 * On hw interrupt, it's IRQ number:
 */
    unsigned long orig_rax; /* 系统调用号。 */
/* Return frame for iretq
 * 内核态返回用户态需要恢复现场的数据。*/
    unsigned long ip;       /* 保存程序调用 syscall 的下一条指令地址。 */
    unsigned long cs;       /* 用户态代码起始段地址。 */
    unsigned long flags;    /* 用户态的 CPU 标志。 */
    unsigned long sp;       /* 用户态的栈顶地址(栈内存是向下增长的)。 */
    unsigned long ss;       /* 用户态的数据段地址。 */
/* top of stack page */
};
3.3. do_syscall_64
do_syscall_64 主要功能:
- 根据系统调用号,调用
系统跳转表(sys_call_table)对应的函数。 - 保存系统调用函数执行结果。
- 恢复程序的工作模式,从内核模式切换回用户模式。
1
2
3
4
5
ENTRY(entry_SYSCALL_64)
    ...
    call    do_syscall_64           /* returns with IRQs disabled */
    ...
END(entry_SYSCALL_64)
1
2
3
4
5
6
7
8
9
10
11
12
13
14
15
16
17
18
19
20
21
/* arch/x86/entry/common.c */
#ifdef CONFIG_X86_64
__visible void do_syscall_64(unsigned long nr, struct pt_regs *regs) {
    struct thread_info *ti;
    ...
    /*
     * NB: Native and x32 syscalls are dispatched from the same
     * table.  The only functional difference is the x32 bit in
     * regs->orig_ax, which changes the behavior of some syscalls.
     */
    nr &= __SYSCALL_MASK;
    if (likely(nr < NR_syscalls)) {
        nr = array_index_nospec(nr, NR_syscalls);
        /* 通过系统调用跳转表,调用系统调用号对应的函数。
         * 函数返回值保存在 regs->ax 里,最后将这个值,保存到 rax 寄存器传递到用户空间。 */
        regs->ax = sys_call_table[nr](regs);
    }

    syscall_return_slowpath(regs);
}
#endif
3.4. 系统调用表
系统调用表 syscall_64.tbl,建立了系统调用号与系统调用函数名的映射关系。脚本会根据这个表,自动生成相关的映射源码。
1
2
3
4
5
6
7
8
9
10
11
12
13
14
15
16
# arch/x86/entry/syscalls/syscall_64.tbl
#
# 64-bit system call numbers and entry vectors
#
# The format is:
# <number> <abi> <name> <entry point>
#
# The __x64_sys_*() stubs are created on-the-fly for sys_*() system calls
#
# The abi is "common", "64" or "x32" for this file.
#
# 系统调用号  abi(应用程序二进制接口)类型       函数名           系统调用函数名
     0               common                 read           __x64_sys_read
     1               common                 write          __x64_sys_write
     2               common                 open           __x64_sys_open
...
3.5. 系统跳转表(sys_call_table)
- 运行流程。系统调用的执行流程如下,但是系统调用号、系统跳转表,系统调用函数,这三者是如何关联起来的呢?
1
syscall's number -> syscall -> entry_SYSCALL_64 -> do_syscall_64 -> sys_call_table -> __x64_sys_write
- sys_call_table 的定义。
#include <asm/syscalls_64.h>这行源码对应的文件是在内核编译的时候,通过脚本创建的。
1
2
3
4
5
6
7
8
9
10
11
12
13
14
15
/* include/generated/asm-offsets.h */
#define __NR_syscall_max 547 /* sizeof(syscalls_64) - 1 */

/* arch/x86/entry/syscall_64.c */
#define __SYSCALL_64(nr, sym, qual) [nr] = sym,

/* arch/x86/entry/syscall_64.c */
asmlinkage const sys_call_ptr_t sys_call_table[__NR_syscall_max+1] = {
    /*
     * Smells like a compiler bug -- it doesn't work
     * when the & below is removed.
     */
    [0 ... __NR_syscall_max] = &sys_ni_syscall,
#include <asm/syscalls_64.h>
};
- Makefile。通过执行 syscalltbl.sh 脚本,解析系统调用文件 syscall_64.tbl 数据,自动生成 syscalls_64.h。
1
2
3
4
5
# arch/x86/entry/syscalls/Makefile
syscall64 := $(srctree)/$(src)/syscall_64.tbl
systbl := $(srctree)/$(src)/syscalltbl.sh
quiet_cmd_systbl = SYSTBL  $@
      cmd_systbl = $(CONFIG_SHELL) '$(systbl)' $< $@
- syscalltbl.sh
1
2
3
4
5
6
7
8
9
10
11
12
13
14
15
16
17
18
# arch/x86/entry/syscalls/syscalltbl.sh
...
syscall_macro() {
    abi="$1"
    nr="$2"
    entry="$3"

    # Entry can be either just a function name or "function/qualifier"
    real_entry="${entry%%/*}"
    if [ "$entry" = "$real_entry" ]; then
        qualifier=
    else
        qualifier=${entry#*/}
    fi

    echo "__SYSCALL_${abi}($nr, $real_entry, $qualifier)"
}
...
- syscalls_64.h 文件内容。
1
2
3
4
5
6
7
8
9
10
11
12
13
/* arch/x86/include/generated/asm/syscalls_64.h */
...
#ifdef CONFIG_X86
__SYSCALL_64(0, __x64_sys_read, )
#else /* CONFIG_UML */
__SYSCALL_64(0, sys_read, )
#endif
#ifdef CONFIG_X86
__SYSCALL_64(1, __x64_sys_write, )
#else /* CONFIG_UML */
__SYSCALL_64(1, sys_write, )
#endif
...
- 三者关系。通过上述操作,sys_call_table 的定义与 syscalls_64.h 文件内容结合起来就是一个完整的数组初始化,将系统调用号,系统调用函数,系统跳转表三者结合起来了。
1
2
3
4
5
6
7
8
9
asmlinkage const sys_call_ptr_t sys_call_table[__NR_syscall_max+1] = {
    /*
     * Smells like a compiler bug -- it doesn't work
     * when the & below is removed.
     */
    [0 ... __NR_syscall_max] = &sys_ni_syscall,
    [0] = __x64_sys_read,
    [1] = __x64_sys_write,
    ...
- 系统调用函数。现在虽然搞清楚了系统调用的关系,但是还没有发现
__x64_sys_write这个函数是在哪里定义的。答案就在这个宏SYSCALL_DEFINE3,将这个宏展开,回头再看上面 gdb 调试断点截断处的那些函数,整个思路就清晰了。
1
2
3
4
__do_sys_write() (/root/linux-5.0.1/fs/read_write.c:610)
__se_sys_write() (/root/linux-5.0.1/fs/read_write.c:607)
__x64_sys_write(const struct pt_regs * regs) (/root/linux-5.0.1/fs/read_write.c:607)
...
1
2
3
4
5
6
7
8
9
10
11
12
13
14
15
16
17
18
19
20
21
22
23
24
25
26
27
28
29
30
31
32
/* fs/read_write.c */
SYSCALL_DEFINE3(write, unsigned int, fd, const char __user *, buf,
        size_t, count) {
    return ksys_write(fd, buf, count);
}

/* include/linux/syscalls.h */
#define SYSCALL_DEFINE3(name, ...) SYSCALL_DEFINEx(3, _##name, __VA_ARGS__)

#define SYSCALL_DEFINEx(x, sname, ...)                \
    SYSCALL_METADATA(sname, x, __VA_ARGS__)           \
    __SYSCALL_DEFINEx(x, sname, __VA_ARGS__)

/* arch/x86/include/asm/syscall_wrapper.h */
#define __SYSCALL_DEFINEx(x, name, ...)                                \
    asmlinkage long __x64_sys##name(const struct pt_regs *regs);       \
    ALLOW_ERROR_INJECTION(__x64_sys##name, ERRNO);                     \
    static long __se_sys##name(__MAP(x,__SC_LONG,__VA_ARGS__));        \
    static inline long __do_sys##name(__MAP(x,__SC_DECL,__VA_ARGS__)); \
    asmlinkage long __x64_sys##name(const struct pt_regs *regs)        \
    {                                                                  \
        return __se_sys##name(SC_X86_64_REGS_TO_ARGS(x,__VA_ARGS__));  \
    }                                                                  \
    __IA32_SYS_STUBx(x, name, __VA_ARGS__)                             \
    static long __se_sys##name(__MAP(x,__SC_LONG,__VA_ARGS__))         \
    {                                                                  \
        long ret = __do_sys##name(__MAP(x,__SC_CAST,__VA_ARGS__));     \
        __MAP(x,__SC_TEST,__VA_ARGS__);                                \
        __PROTECT(x, ret,__MAP(x,__SC_ARGS,__VA_ARGS__));              \
        return ret;                                                    \
    }                                                                  \
    static inline long __do_sys##name(__MAP(x,__SC_DECL,__VA_ARGS__))
4. 后记
- 很多底层的源码,阅读起来比较费劲,用 gdb 调试,或者反汇编查看最底层的逻辑,也是一种很好理解源码意图的方法。
- 本人是汇编小白,能力有限,虽然翻阅了大量资料,难免有很多错漏,有待指正~
5. 参考
- 《Linux 内核设计与实现》
- 《深入理解计算机系统》
- 一文让你明白CPU上下文切换
- ctf中关于syscall系统调用的简单分析
- 09 | 系统调用:公司成立好了就要开始接项目
- 使用objdump查看动态库和静态库中具有哪些函数
- 系统调用的实现
- System calls in the Linux kernel. Part 1.
- How does the Linux kernel handle a system call
- 段寄存器的前世今生
- assembly - How to use FS / GS register in Linux AMD64?
- 一口气看完45个寄存器,CPU核心技术大揭秘
- 现代操作系统内存管理到底是分段还是分页,段寄存器还有用吗?
- linux kernel 爬坑记录