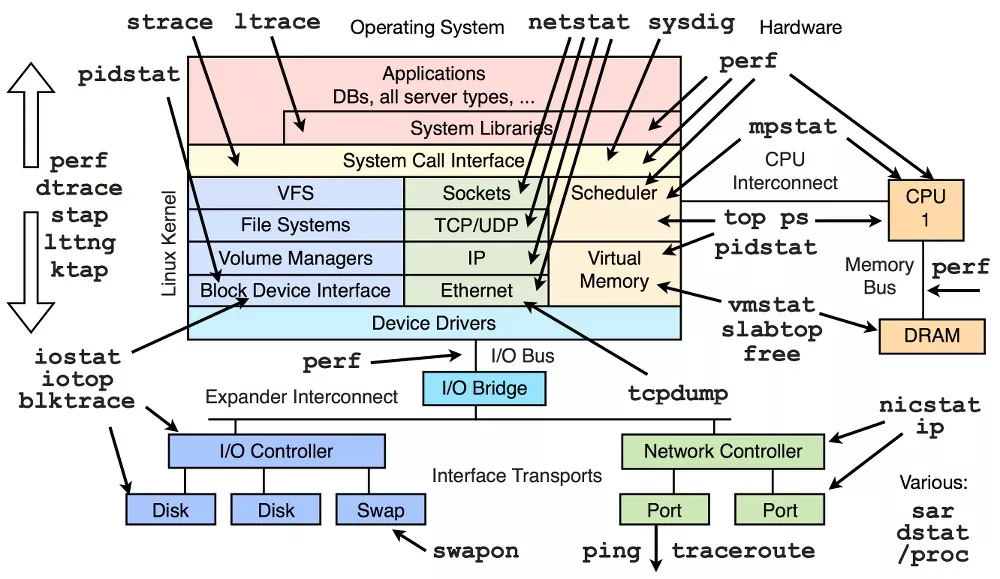
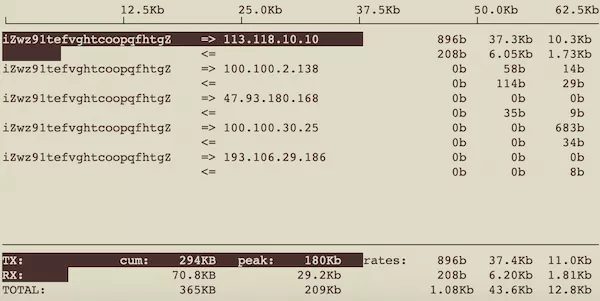
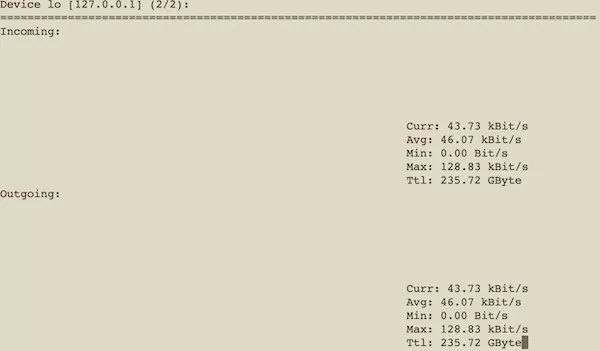
Centos 等 Linux 平台常用命令,记录起来,方便使用。
图片来源:Linux Performance。
1. 系统
1.1. 机器启动
1
2
3
| poweroff
reboot
shutdown -r now
|
1.2. 修改密码
1.3. 查看 CPU 信息
1
2
3
4
5
| # cpu 个数。
cat /proc/cpuinfo | grep "processor" | wc -l
# cpu 信息。
lscpu
|
1.4. 查看系统信息
1
2
3
| uname -a
cat /proc/version
cat /etc/redhat-release
|
1.5. 软链接
1.6. 压缩解压
1
2
3
4
| zip -r mydata.zip mydata
unzip mydata -d mydatabak
tar zcf mydata.tar.gz mydata
tar zxf mydata.tar.gz
|
1.7. 更新文件配置
1.8. 机器是多少位
1
| file /sbin/init 或者 file /bin/ls
|
1.9. 环境变量
1.10. 用户切换
1.11. 日期
1
2
3
4
5
6
7
8
9
10
11
| # 格式化时间戳为日期输出
timestamp_to_date() {
timestamp_in_seconds=$(echo "scale=3; $1/1000" | bc)
date -d @$timestamp_in_seconds +"%Y-%m-%d %H:%M:%S.%3N"
}
alias tsdate='timestamp_to_date'
# date -d @1361542596 +"%Y-%m-%d %H:%M:%S"
# 2013-02-22 22:16:36
# tsdate 1712982114618
# 2024-04-13 12:21:54.618
|
1.12. 同步时间
1
2
3
4
5
6
7
| # 修改中国时间
rm -rf /etc/localtime
ln -s /usr/share/zoneinfo/Asia/Shanghai /etc/localtime
# 同步远程时间。
yum install -y ntpdate
ntpdate ntp.aliyun.com
|
1.13. 进程绝对路径
1
2
3
4
| top -c
htop
ls -l /proc/pid
ps -ef
|
2. 内存
2.1. 查看系统内存情况
2.2. 查看进程内存映像
2.3. vmstat
命令查看内存转换情况,跟踪转换的频率
swap 原因:系统内存不足会产生 swap,磁盘的速度读写速度是比较慢的,这会影响性能。
vmstat 1 每秒输出一次统计结果
不是 swap 空间占用性能就会下降,要看 si so 频率。
参考 《Linux vmstat命令详解》
3. 文本
3.1. awk
awk [操作] [文件名]
1
2
3
4
5
6
7
8
| echo 'this is a test' | awk '{print $0}'
echo 'this is a test' | awk '{print $3}'
awk -F ':' '{ print $1 }' demo.txt
echo 'this is a test' | awk '{print $NF}'
awk -F ':' '{print $1, $(NF-1)}' demo.txt
awk -F ':' '{if ($1 > "m") print $1; else print "---"}' demo.txt
du | awk '{print $1}' |sort -nr
ps -ef | grep gdb | grep -v grep | awk '{print $3}' | xargs sudo kill -9
|
3.2. sed
字符串处理。
1
2
3
4
5
6
| # replace
sed -i "s/jack/tom/g" test.txt
sed -i "s/\/usr\/local\/bin/\/usr\/bin/g" /etc/init.d/fdfs_storaged
# find and delete line.
sed '/gettimeofday/d' /tmp/connect.slave
|
1
| sed -i '' 's/\/usr\/local\/bin/\/usr\/bin/g' /etc/init.d/fdfs_storaged
|
3.3. grep
| 命令 |
描述 |
| -l |
列出文件名。 |
| -r |
递归遍历文件夹。 |
| -n |
显示文件行数。 |
| -E |
查找多个。 |
| -i |
大小写匹配查找字符串。 |
| -w |
匹配整个单词,而不是字符串。 |
| –include |
搜索指定文件。 |
| –exclude-dir |
排除指定文件夹。 |
| -A |
列出搜索到的内容后面的几行内容。 grep xxxx -A 10 |
找出文件(filename)中包含123或者包含abc的行
1
| grep -E '123|abc' filename
|
只匹配整个单词,而不是字符串的一部分(如匹配‘magic’,而不是‘magical’)。
文件中查找字符串。
1
| grep "update" moment_audit.log | wc -l
|
递归文件夹在指定文件查找字符串。
1
| grep -r "pic" --include "*.md" .
|
4. 磁盘文件
4.1. ls
| 选项 |
描述 |
| -a |
列出目录所有文件,包含以.开始的隐藏文件 |
| -A |
列出除.及..的其它文件 |
| -r |
反序排列 |
| -t |
以文件修改时间排序 |
| -S |
以文件大小排序 |
| -h |
以易读大小显示 |
| -l |
除了文件名之外,还将文件的权限、所有者、文件大小等信息详细列出来 |
1
2
3
4
5
| # 文件个数
# 不含子文件
ls -l |grep "^-"|wc -l
# 包括子文件
ls -lR|grep "^-"|wc -l
|
4.2. tree
显示目录结构
4.3. du
用于显示目录或文件的大小。
| 选项 |
描述 |
| -h |
以K,M,G为单位,提高信息的可读性。 |
| -s |
仅显示总计。 |
1
2
3
4
5
| # 查看文件夹大小。
du -sh dir
# 从小到大排列文件。
du | sort -n -k1
|
4.4. df
用于显示目前在Linux系统上的文件系统的磁盘使用情况统计。
4.5. tail
1
2
| tail -f file
tail -f file | grep '123'
|
4.6. find
1
| find path -option [print] [-exec -ok command] {} \;
|
| 选项 |
描述 |
| -name name, -iname name |
文件名称符合 name 的文件。iname 会忽略大小写 |
| -size |
文件大小 |
| -type |
文件类型
f 一般文件
d 目录 |
| -perm |
对应文件目录权限 |
1
2
3
4
5
6
7
8
9
10
11
12
13
14
15
16
17
18
19
20
21
22
23
24
25
26
| # 查找删除文件
find / -name "*.mp3" |xargs rm -rf
# 查询最近两个小时修改过的文件
find /work/imdev/IM3.0 -iname "*" -mmin -120 -type f
# linux 命令行转换,将源码文件 tab 替换为 4 个空格
find . -regex '.*\.h\|.*\.hpp\|.*\.cpp' ! -type d -exec bash -c 'expand -t 4 "$0" > /tmp/e && mv /tmp/e "$0"' {} \;
# 查找大于 500 字节的文件,并且删除。
find ./ -size +500 | xargs rm -f
# 找出空文件
find / -type f -size 0 -exec ls -l {} \;
# 在某路径,查找带 xxx 关键字的所有文件,列出文件完整路径,文件行数。
find ~/src/other/c_test -name '*.cpp' -type f | xargs grep -n 'include'
# 将文件转换为 unix 格式
find . -type f -exec dos2unix {} \;
# 查找有执行权限文件
find . -perm -111
# 查找指定文件,将文件拷贝到指定目录。
find . -name '*.so' -type f -exec cp -f {} ../../bin/modules \;
|
5. 权限
5.1. 执行权限
1
2
| chmod +x _file
chown -Rf imdev:imdev _folder
|
6. 进程线程
6.1. 查找进程
1
| ps aux | grep _proxy_srv
|
6.2. 进程启动绝对路径
1
2
| ps -ef | grep xxx
ll /proc/pid | grep exe
|
6.3. 查进程名称对应的 pid
1
2
| ps -ef | grep process_name | grep -v "grep" | awk '{print $2}'
pidof redis-server
|
6.4. 进程启动时间
1
2
| ps -p PID -o lstart
ps -ef | grep redis | awk '{print $2}' | xargs ps -o pid,tty,user,comm,lstart,etime -p
|
6.5. 查看线程
1
2
3
| top -H -p pid
ps -efL | mysql | wc -l
pstree -p 1234 | wc -l
|
7. 网络
7.1. 网卡
1
2
3
4
5
6
7
8
| # 展示所有网卡。
ifconfig -a
# 启用 eth0 网卡
ifconfig eth0 up
# 关闭 eth0 网卡
ifconfig eth0 down
|
7.2. 修改 DNS
1
2
3
4
5
6
| # 这个方法是临时的,重启失效。
vi /etc/resolv.conf
# 填充内容。
nameserver 8.8.8.8
nameserver 4.4.4.4
|
7.3. 防火墙
1
2
| service iptables start
service iptables stop
|
7.4. 开放端口
1
2
3
4
| # centos
vi /etc/sysconfig/iptables
-A INPUT -m state --state NEW -m tcp -p tcp --dport 19007 -j ACCEPT
systemctl restart iptables.service
|
7.5. scp
- scp -P端口号 本地文件路径 username@服务器ip:目的路径
- 从服务器下载文件到本地,scp -P端口号 username@ip:路径 本地路径
1
2
3
| scp -P端口号 username@ip:路径 本地路径
scp -r root@120.25.44.163:/home/hhx/srv_20150120.tar.gz .
scp /Users/wenfh2020/src/other/c_test/normal/proc/main.cpp root@120.25.44.163:/home/other/c_test/normal/proc
|
7.6. rsync
1
2
3
4
5
6
7
8
9
10
11
12
13
14
15
16
17
18
19
20
| #!/bin/sh
work_path=$(dirname $0)
cd $work_path
work_path=$(pwd)
rsync -avz --exclude="*.o" \
--exclude=".git" \
--exclude=".vscode" \
--exclude="*.so" \
--exclude="*.a" \
--exclude="*.log" \
--exclude="co_kimserver" \
--exclude="test/test_log/test_log" \
--exclude="test/test_mysql_mgr/test_mysql_mgr" \
--exclude="test/test_tcp/test_tcp" \
--exclude="test/test_tcp/test_tcp_pressure" \
--exclude="test/test_mysql/test_mysql" \
--exclude="test/test_timer/test_timer" \
~/src/other/coroutine/co_kimserver/ root@192.168.0.155:/home/other/coroutine/back
|
7.7. nslookup
查域名对应的 ip
1
2
3
4
5
6
7
8
| # nslookup wenfh2020.com
Server: 116.116.116.116
Address: 116.116.116.116#53
Non-authoritative answer:
Name: wenfh2020.com
Address: 120.25.83.163
|
7.8. ssh
1
| ssh -p22 root@120.25.44.163
|
7.9. tcpdump
Linux tcpdump 命令用于倾倒网络传输数据
| 选项 |
描述 |
| -c |
<数据包数目> 收到指定的数据包数目后,就停止进行倾倒操作。 |
| -i |
<网络界面> 使用指定的网络截面送出数据包。 |
| -n |
不把主机的网络地址转换成名字。 |
| -q |
快速输出,仅列出少数的传输协议信息。 |
| -v |
详细显示指令执行过程。 |
| -vv |
更详细显示指令执行过程。 |
| -w |
<数据包文件> 把数据包数据写入指定的文件。 |
1
2
3
4
5
6
7
8
9
10
11
12
| tcpdump port 80 and host www.baidu.com
tcpdump host 192.168.100.18 and dst host 10.10.10.122
tcpdump -i eth0 -vnn dst host 10.10.10.122
tcpdump -i eth0 -vnn src host 192.168.100.18 and dst port 8060
tcpdump -i ens33 -vnn host 192.168.1.80 and port 443 -w /tmp/123.cap
#生产环境内网抓包。
tcpdump -i eth1 port 12911 -vvvv -nnn -w 123.cap
#内循环 127.0.0.1
tcpdump -i lo port 8333
tcpdump -i eth0 host api.fyber.com and port 80 -w 123.cap
|
7.10. wget
1
| wget http://debuginfo.centos.org/6/x86_64/glibc-debuginfo-2.12-1.80.el6.x86_64.rpm
|
7.11. netstat
netstat 命令用于显示网络状态
1
| netstat [-acCeFghilMnNoprstuvVwx][-A<网络类型>][--ip]
|
| 选项 |
描述 |
| -a |
显示所有连线中的Socket。 |
| -l |
显示监控中的服务器的Socket。 |
| -n |
直接使用IP地址,而不通过域名服务器。 |
| -p |
显示正在使用Socket的程序识别码和程序名称。 |
| -t |
显示TCP传输协议的连线状况。 |
| -u |
显示UDP传输协议的连线状况。 |
1
| netstat -nat|grep -i "80"|wc -l
|
7.12. ss
参考:Linux网络状态工具ss命令使用详解
7.13. lsof
7.14. nc
1
2
3
4
| # 启动监听 8333 端口的服务。
nc -l 8333
# 连接指定服务,显示数据。
nc -nvv 127.0.0.1 8333
|
7.15. curl
1
2
3
4
5
| # curl 访问某个域名
curl https://lan-grpc.abc.in/ -vv
# curl POST json 通信
curl 'https://lan-grpc.abc.in/register/send_notify' -X POST -H 'Content-Type: application/json' -d '{"Param":"","Token":"0dda18b27de4f82e35344bf7af960b76","TokenCheckCode":"123479"}'
|
7.15. wireshark
1
2
3
4
5
6
7
8
| # 域名过滤。
dns.qry.name contains "service.abc.woa.com"
# 抓取指定域名的包。
http.host contains git-70503.gzc.vod.abc-cloud.com
# ip 过滤
ip.addr==9.147.124.231
# 端口过滤
tcp.port == 3002
|
8. 其它
8.1. 有空格的路径 grep 操作
1
| infos=`grep -r $src_pic_path --include '*.md' . | tr " " "\?"`
|
8.2. 有空格路径进行 sed 操作
1
| sed -i '' "s:$src_pic_path:\.\/pic:g" $file
|
8.3. printf
1
2
3
4
5
| printf '%d\n' 0xA
printf '%X\n' 320
local end_time=`date +"%Y-%m-%d %H:%M:%S"`
printf "%-10s %-11s" "end:" $end_time
|
8.4. xargs
是给命令传递参数的一个过滤器。
1
2
3
| find /etc -name "*.conf" | xargs ls –l
cat url-list.txt | xargs wget –c
find / -name *.jpg -type f -print | xargs tar -cvzf images.tar.gz
|
8.5. mysql 常用命令
不同平台下,启动 mysql 服务。
1
2
3
4
5
| # MacOS
brew services start mysql
# centos7
systemctl start mysqld
|
9. 工具
9.1. top
1
2
3
4
5
6
7
8
| #显示完整命令
top -c
# 查看字段解析
shift + f
# 内存排序
shift + m
# cpu 排序
shit + p
|
9.2. htop
9.3. iftop
9.4. nload
9.5. nethogs
9.6. iotop
1
2
3
4
5
6
7
8
| [root:...rver/src/test/test_pressure]# iotop -botq |grep kim-
16:12:21 5201 be/4 root 0.00 B/s 2.05 M/s 0.00 % 0.00 % kim-gate_w_1
16:12:21 5202 be/4 root 0.00 B/s 1031.49 K/s 0.00 % 0.00 % kim-gate_w_2
16:12:21 5208 be/4 root 0.00 B/s 2023.31 K/s 0.00 % 0.00 % kim-logic_w_1
16:12:22 5195 be/4 root 0.00 B/s 3.78 K/s 0.00 % 0.00 % kim-gate .
16:12:22 5201 be/4 root 0.00 B/s 2.26 M/s 0.00 % 0.00 % kim-gate_w_1
16:12:22 5202 be/4 root 0.00 B/s 2.91 M/s 0.00 % 0.00 % kim-gate_w_2
16:12:22 5208 be/4 root 0.00 B/s 1721.45 K/s 0.00 % 0.00 % kim-logic_w_1
|
9.7. strace
macos: dtruss
1
2
3
4
5
6
7
8
9
10
11
12
13
14
| # 跟踪具体的进程信息
strace -p <PID>
# 统计
strace -cp <PID>
# 单独跟踪某个被定位的内核函数
strace -T -e clone -p <PID>
# 显示调用高耗能内核函数的业务代码。
strace-eclone php -r 'exec("ls");'
# 抓取进程启动工作流程
strace -s 512 -o /tmp/sentinel.log ./redis-sentinel sentinel.conf
|
10. 参考


